2020-2025 Tesla Model Y Precut Paint Protection Kit PPF – Full Front+
Sale! $449.99
Description
2020 – 2025 Tesla Model Y Precut Paint Protection Kit PPF – Full Front+
-
This Kit Includes:
FULL Front BUMPER | No Parking Sensors
FULL HOOD
FULL FENDERS
HEADLIGHTS + FOGS
MIRRORS
A PILLARS + Roof Top
Fits: Long Range All Wheel Drive – Long Range Rear Wheel Drive – Performance – RWD
Installation Difficulty: ( MODERATE )
Your ultimate destination for top-notch Paint Protection Film (PPF) solutions!
At Precut PPF store, we are dedicated to preserving the beauty and integrity of your vehicle’s paint finish with cutting-edge PPF technology.
Discover the perfect blend of aesthetics and protection as you explore our extensive range of high-quality PPF products.
Whether you’re a car enthusiast, a daily commuter, or a professional detailer, our selection caters to all needs and preferences.
Why choose Precut PPF Store for your PPF needs?
- Premium Quality Films: We source and offer PPF products from leading manufacturers known for their superior quality and durability. Trust us to provide the best protection for your vehicle’s paint.
- Custom Solutions: Every vehicle is unique, and so are its protection needs. Explore our customizable PPF solutions to ensure a seamless fit and coverage tailored to your specific make and model.
- Easy Installation: Our user-friendly PPF solutions make installation a breeze. Whether you’re a DIY enthusiast or prefer professional installation, our films are designed for easy application.
- Unrivaled Protection: Shield your vehicle from road debris, stone chips, bug splatter, bird droppings, and harsh weather conditions. Our PPF offers an invisible layer of defense without compromising your vehicle’s aesthetics.
- Long-lasting Performance: Experience the longevity of our PPF products. With advanced self-healing capabilities and resistance to yellowing, our films maintain their clarity and protection for years to come.
- Educational Resources: Not sure where to start? Explore our comprehensive guides and resources to learn more about the benefits of PPF, installation tips, and maintenance advice.
At Precut PPF Kits, we are passionate about helping you keep your vehicle looking pristine.
Join countless satisfied customers who have chosen us for their PPF needs.
Elevate your car care routine with the ultimate in paint protection—explore PrecutPPF.store today!
Simplify your car maintenance routine with our Paint Protection Film, ensuring your vehicle maintains its showroom-fresh appearance effortlessly.
Resilient against airborne rocks, bird droppings, salt, sand, and various elements, our film is available in multiple finishes, innovative 2-in-1 options, and popular choices.
Each product boasts self-healing properties, undergoes rigorous testing, and is backed by the manufacturer.
Choose the coverage that suits your needs, select your preferred product, and hit the road with confidence.
Automotive Paint Protection Film, a transparent urethane material applicable to any exterior painted surface, acts as a safeguard against various damages:
- Chips and scratches from rocks and road debris
- Swirl marks during washing
- Chemical stains and etch marks from acidic contaminants
- Hard water spots caused by mineral deposits
- Oxidation (fading) due to UV exposure
Begin by applying Paint Protection Film to the most vulnerable areas, such as the front bumper, hood, fenders, side mirrors, rocker panels, and rear wheel arch, susceptible to rock chips and scratches.
Since Ceramic Coating doesn’t protect against this damage, the film provides crucial coverage.
Available Brands: PPF 8 Mil | PPF 10 Mil | Stek DynoShield | 3M Pro Series 4 | 3M Pro G200 | Madico | Ultimate | Fusion | Dura-Shield | SolarGard |
All Precuts are Subject To Change for Ease of Install
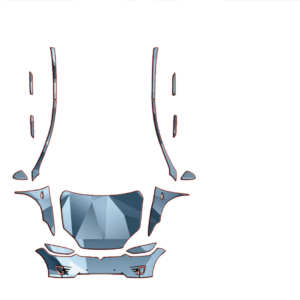
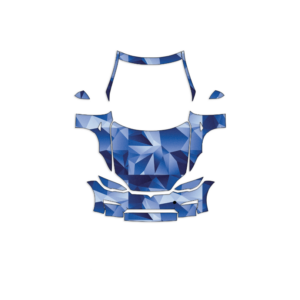
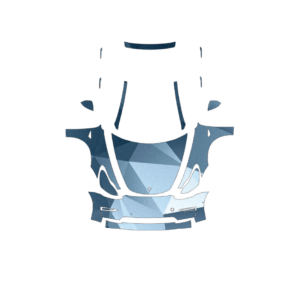
All Precuts Pictured In The Listing Are What Will Be Included
The textured color depicted in the picture is purely for aesthetics; the actual paint protection comes in clear or matte options, depending on your chosen film.
Only the Matte finish provides a flat appearance, while other brands offer glossy finishes, some with additional hydrophobic properties.
Additional information
| Weight | 6 lbs |
|---|---|
| Dimensions | 60 × 3 × 3 in |
| Brand | Stek Dynoshield |
| Tesla Model Y | 2020, 2021, 2022, 2023, 2024 2025 |
39 reviews for 2020-2025 Tesla Model Y Precut Paint Protection Kit PPF – Full Front+
FAQs
GUIDANCE ON SELECTING OPTIONS FOR YOUR PRECUT PAINT PROTECTION KIT
Select Paint Protection Film Brand: *
Please select your preferred paint protection brands.
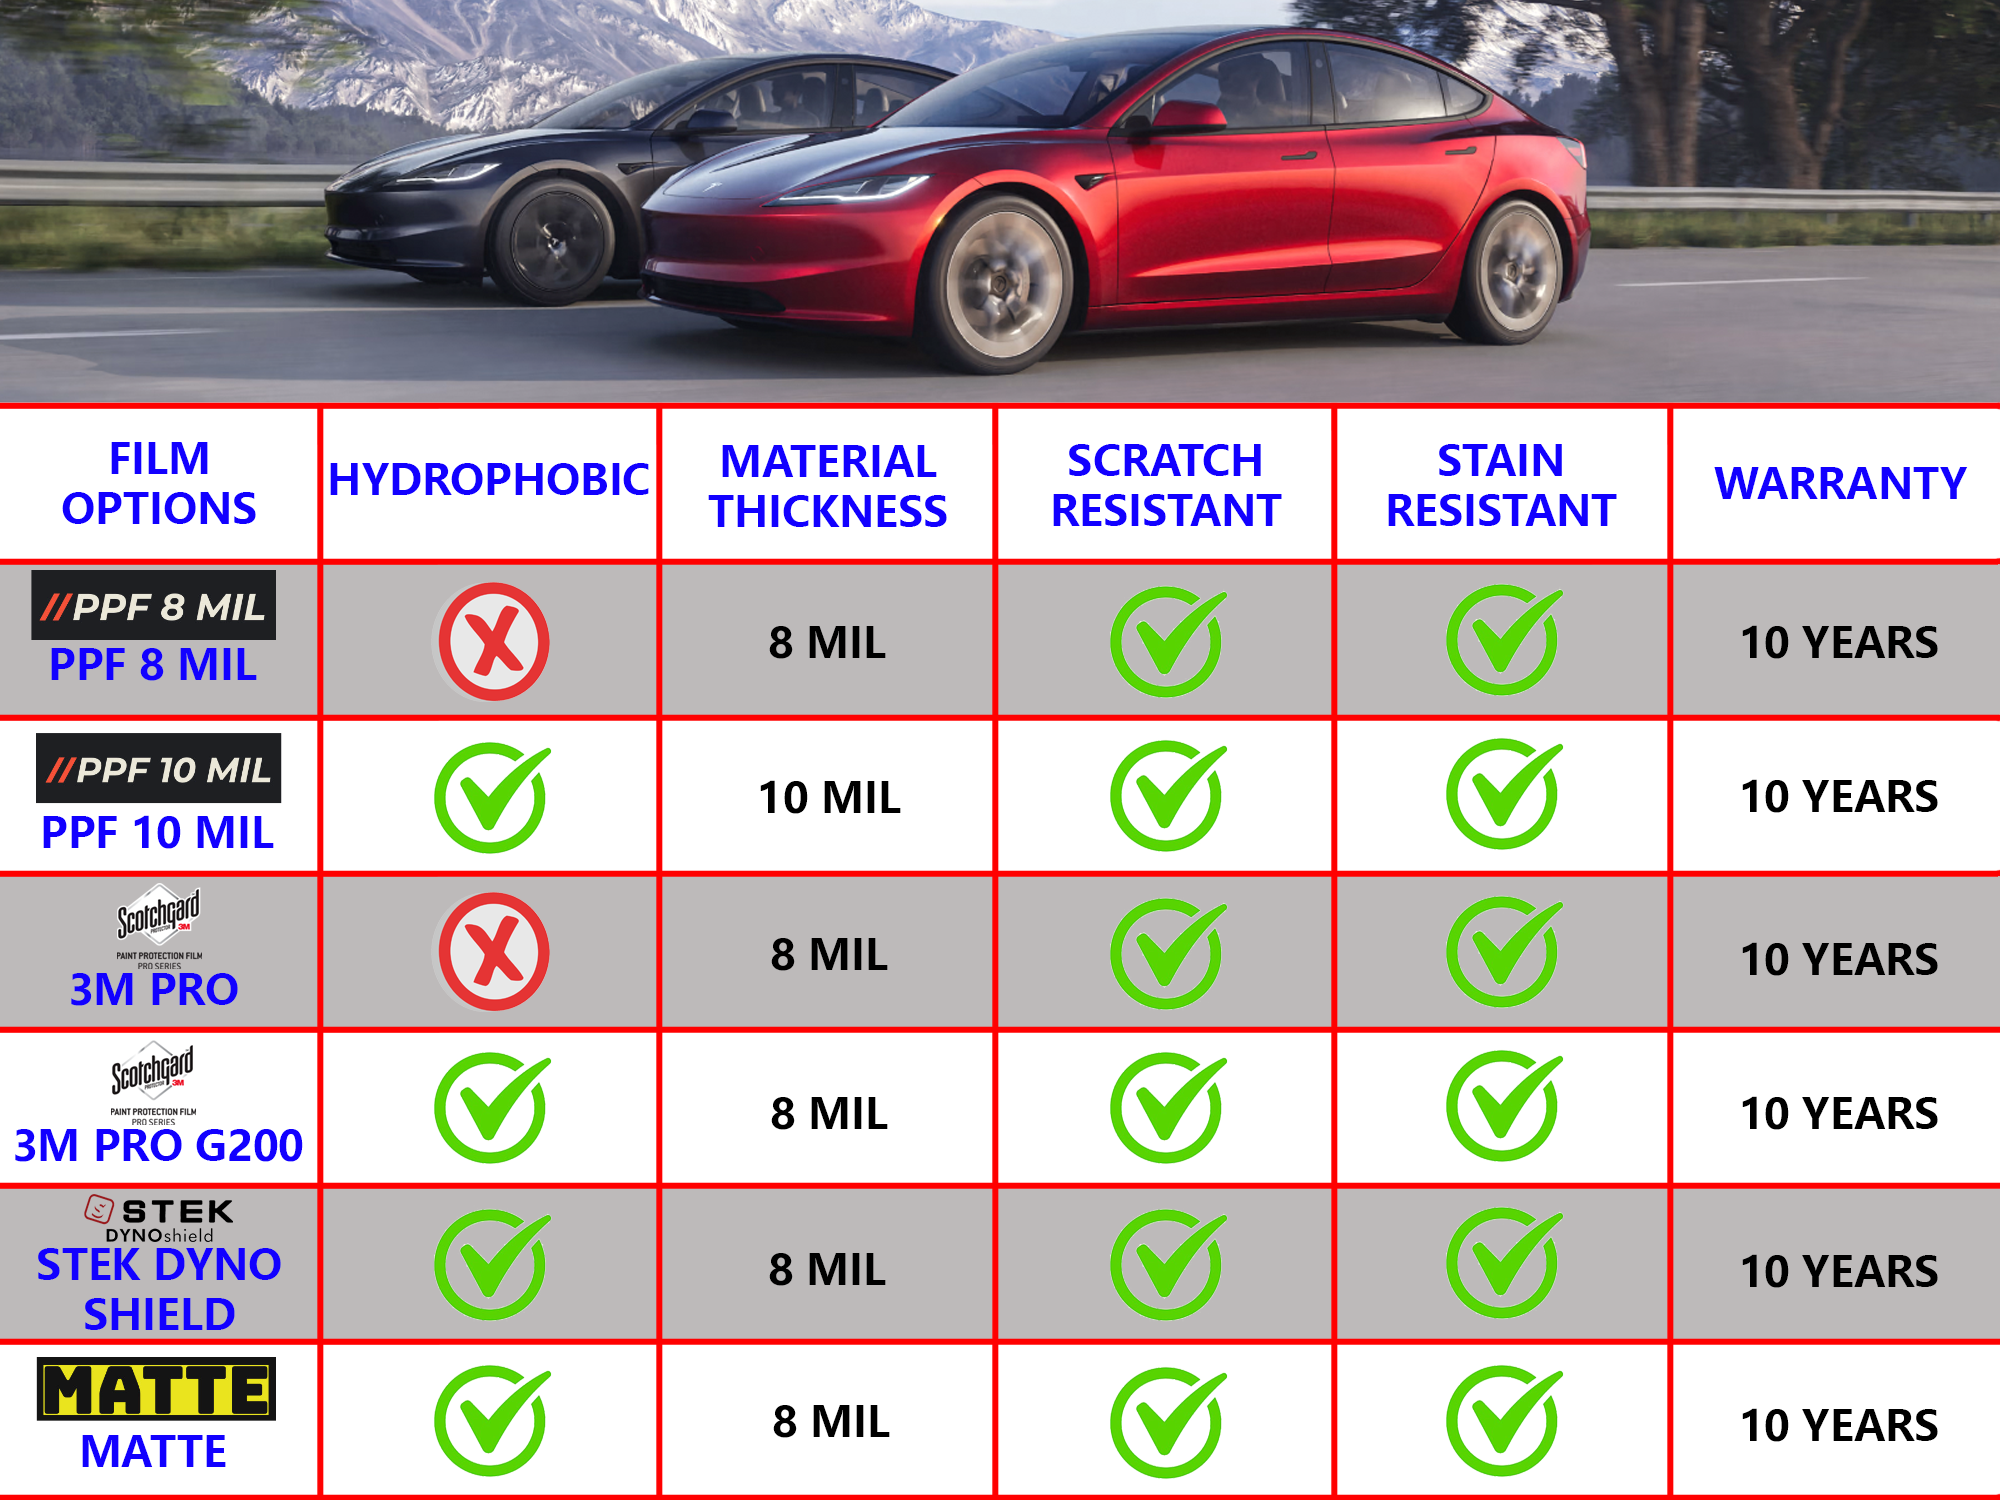
You can view the specifications of each film, including properties and warranty information, in the second image adjacent to the precut image in the additional gallery.
Parking Sensors: *
Many newer or older vehicles come equipped with parking sensors—small round sensors attached to the front bumper.
Please indicate whether your vehicle has parking sensors or not. Alternatively, if your parking sensors are flush with the bumper, you can select "NO" to cover them.
This way, you can protect the parking sensors while ensuring their functionality. The proximity of the parking sensors will still work once the PPF material dries.
Edge Wrapping *
Edge wrapping is included on specific panels such as the hood, top of the fenders, and certain areas around bumpers. For example, it won't be present on all panels; rather, it's applied based on the selected patterns for your vehicle's make by the kit manufacturer. This helps prevent peeling and ensures easy installation.
We also provide custom wrapping options for an additional cost. If you wish to add or remove wrapping from specific places, our team is available to assist you. Please email us before purchasing your kit.
Vehicles: Year | Make | Model | Trim *
Kindly provide the Year, Make, Model, and Trim of your vehicle. Our team will cut a precut kit tailored to your vehicle's specified trim.
Vehicle Pictures:
While not mandatory, providing pictures of your exact vehicle significantly expedites the process. This allows us to confirm details such as trim, emblems, moldings, parking sensors, etc. We kindly request that you provide images of your vehicle to ensure accurate cuts. Although we are familiar with various makes and models, some vehicles may have additional features like sensors, fender flares, bumper trims, etc.
If the kit manufacturer offers multiple vehicle trim options, submitting pictures becomes a requirement. If you haven't provided an image during the kit purchase, our team will reach out to request one. Please note that we cannot process your order promptly until we receive the necessary image.
Related products
-
2016-2021 Tesla Model X Precut Paint Protection Kit Full Front+
$449.99 Select options Quick ViewRated 5.00 out of 56 -
2020-2025 Tesla Model Y Precut Paint Protection PPF Kit – Full Front
$449.99 Select options Quick ViewRated 5.00 out of 56 -
2022-2025 Tesla Model S Plaid Precut Paint Protection Kit – Full Front+
$449.99 Select options Quick ViewRated 5.00 out of 56 -
2017-2023 Tesla Model 3 Precut Paint Protection Kit PPF – Full Front
$449.99 Select options Quick ViewRated 5.00 out of 510




Garry –
I have nothing but good things to say about this product, and this company, great support, Excellent Fitment & product!!!
FYI: Email: opuspremiumfilms@gmail.com and upgrade partial A-pillars to full coverage, makes it look way better and protects full roof pillar.
Ive installed PPF before, i would never cut on paint ever again with bulk install, don’t ask me how i know. lol. Precut is King in 2021.
Garry
Jon in Maryland –
I can’t say enough good things about Josh and Opus Premium Films! This was my first attempt at PPF. Josh made me a custom kit of XPel Ultimate at a really fair price. More importantly, he was with me every step of the way. Clear instructions and an incredibly fast response to every email I sent him. He helped me not only with the PPF install, but advice on detailing and ceramic coating too. I am extremely pleased with the outcome and my car will be protected for many years to come. As a consumer, this is one of the best experiences I have *EVER* had!
G –
I purchased a complete car kit for my brand new 2021 Model Y from Opus Premium Films. The film arrived last Friday so I started installing this weekend. I figured I’d start a thread to discuss the trials and terrors that are sure to follow as I learn how to install this material.
I have no experience with PPF and only limited, hobby level experience with vinyl, paint, and paint correction. I’ve watched a lot of you tube channels and read any writeups I could find. The owner of the company has been helpful in providing tips / suggestions as well.
The kit I purchased comes with four or five rolls of pre cut panels. Each roll has PPF for various panels. I decided to start with the hood because it is a large flat surface and from most indications should be the easiest. It was a fairly traumatic experience with below average, acceptable results. My second panel was the fender and it turned out significantly better still. Here we go:
Biggest takeaways
– I can do this! It is going to take a lot of practice to have anything close to a professional result, but I can get about 95% there and save over $4k from big-metro prices.
– This takes a long time! The hood took me 2.5-3 hours. I’ve also done a fender and I got the time down to a little over an hour.
– PPF 8 Mil is extremely forgiving. Keep the material VERY wet with slip solution and rewet often. Keep the PPF 8 Mil wet on BOTH sides constantly.
– Don’t overstretch and don’t panic. With lots of slip solution, PPF 8 Mil can recover if it sticks to itself or be removed and repositioned pretty well.
– Lint, dirt, and hairs are the worst. The cleaner a space you have the better. If working outside / partially outside, low wind and warm temperatures will help. Get the surface as clean as you can and always be on the lookout for lint.
– You can do a lot of the early positioning work with your hands before you start squeegeeing and/or taccing the material into place.
– This is not for the faint of heart. PPF is expensive for a reason. I’m undertaking this project so I have the skill set to wrap future cars I’ll own. Its an investment beyond this one car for me.
Things to consider buying for prep:
Car wash supplies – I picked up a foam cannon and a leaf blower for drying. I also purchased premium kirkland microfiber towels and some chemical guys microfiber applicators. Finally, I bought a McGuire’s claybar kit.
Spray bottles – For slip solution, a pump sprayer is very preferred. Also have on hand two other small spray bottles.
Rubber/latex gloves
1. Step 1 – Collect your supplies. In addition to your preferred cleaning supplies, you’re going to need lint free microfiber clothes, 2-3 spray bottles, Isopropyl alcohol and some common soap. For the isopropyl alcohol, I used 70% but 100% would do as well. I put 5-6 ounces of straight alcohol in my smallest spray bottle. This will be for cleaning / removing lint prior to wrap. Then, second small-ish bottle will be for “tac” solution: This should be about 10mL of alcohol to 16 ounces water. You can use distilled water, if you prefer, I did not. Finally, for your “slip” solution: use the best spray bottle you have. I used what I saw most guys using, pump spray bottles that can be purchased at most home repair stores. For soap, the recommendation is johnson and johnson baby soap. You could also use a different baby soap or even dish soap. Mix 16 ounces of water with about 3 drops of soap. If in doubt, round up on the amount of soap you use. Ensure the soap mixes with the water but don’t shake so as to keep the suds and bubbles down.
2. Paint prep. – Wash and clay the car! I have moth balled my MY for several weeks now to avoid damaging our fragile paint. Therefore, the paint is pretty clean. For prep, I washed the car with a chemical guys foam gun. I dryed with an EvGo leaf blower. I then clayed the hood to remove debris and water spots from previous rain.
3. Position the car – If you can do this in a closed garage with exhaust ventilation its probably going to help a great deal to minimize dust. My garage is cluttered from a move, so I made room to get half the car inside with the garage door open… :/
4. Prep the PPF – Unrolling the PPF proved challenging. Each roll I received was 6-9 feet long. I suggest clearing a large, long table if you have one. Another great option would be to hang the PPF from hooks on the wall or even a clothes line. The adhesive side of the PPF is protected like a sticker backing, but you need the space to work with it carefully and avoid introducing unwanted dirt and lint. Once unrolled, find the section you’re doing and cut it out.
In this case, I should have cut out the hood from the roll. Instead, I made the mistake of trying to transfer the hood directly from the massive roll that included multiple panels. That was terrible and ended in us cutting it free after we had already transferred about 1/3 of the hood panel to the car. A bit traumatic.
5. Final prep before application – Using my slip solution, I sprayed down the hood and wiped dry with kirkland microfiber towels. Also clean within 5-6 inches on adjacent panels since the PPF may touch those surfaces when you transfer it to the car. Next, I sprayed the pure alcohol lightly and wiped clean a final time ensuring all dust and lint were removed. For future I plan to try and devote a great amount of my time to this step to get it just right. The towels tend to leave behind very fine dust and hairs without the right environment. I didn’t have the best lighting in my garage and missed some dust / hairs.
6. Applying PPF to the hood – I washed my hands really well. Next time, I’m going to don latex gloves at this point. I grabbed two friends to help with the application, but you can do it alone if you have to.
I suggest reverse rolling the piece you intend to apply, in this case the hood. Once reverse rolled, you will be able to grab a corner and start peeling it away from the backing and transfer it to the paint in a manageable way. Hold the roll in one hand and the exposed PPF in the other. If you have helpers, they can hold down corners of the PPF once applied to the car.
Before you start peeling the PPF away from its backing, rewet the entire hood with an ample amount of slip solution. You can not have too much at this stage. You’re going to want the hood and eventually the adhesive side of the PPF to be wet so the material doesn’t start sticking to either the car or itself. Now, with full confidence in your TMC bretheren and not a fear in your heart, unroll the PPF onto the paint.
I’ll return when I have more time to edit and continue sharing my experience.
Original Discussion Thread: https://teslamotorsclub.com/tmc/posts/5580437/
Nate –
Installation went super smooth, i had previous experience with PPF installs, this time i went with STEK over XPEL.
Very happy, its so clear i cant even tell its on the car, great material with Hydrophobic properties.
Raymond –
Amazing customer support, quality and professionally cut patterns.
Fred –
They were quick to reply to my inquiry, and I was able to receive 3M order in 4 days via 2nd day shipping, Great prices, good service and product.
Frank –
I recently purchased a new Model Y and decided to protect my full front. Josh and his team had exceptionally exceeded my expectations. From the highest quality products offered such as Window film and Paint protection films, to the best custom support i could ask for, to the steps this team took to make my decision a breeze. Truly the best experience. You have a lifelong customer here! Thank you Josh and Precut PPF Store for your excellence!
Joseph –
This store is awesome and they have top brands in stock, PPF installation wasn’t as bad, saved myself few $’s. Final results came out really great!
Manny –
Awesome in every way possible. Experience installing precut kit is required, im not new to clear bra installs, i’ve installed similar kits on different makes and models for years, these guys don’t disappoint, always top notch cuts and great customer service.
Kahn –
Tesla finally got my vehicle delivered, waited 4 months for a new model. I have bought from here since 2019, customers support is the best, prices are very affordable.
Cuts are on point, material stretches like butter. No issues.
Would definitely recommend to everyone who is looking to DIY their tesla.
May –
Amazing support, Dex knows his stuff. If you are attempting a DIY project this is where to buy from.
Simon –
I love all of my cars. Naturally, I wanted to find someone who is trustworthy when it comes to buying a Paint Protection kit from.
It’s really hard to find a good and honest online store that won’t cheat you, PrecutPPF store delivered as promised and everything was packaged well and shipped in a timely manner, I was sent installation video, I carefully watched them but did have some questions which were a little confusing, Josh answered to my emails promptly.
I would never buy from anywhere else.
I and my wife installed PPF in 3 days, I know it took us some time, but I was very careful and installed 1 panel at a time.
Guys leave the bumper to be installed last, once you install the hood, fenders, etc… attempt the bumper on a clear head, it took the most time.
Since the bumper is not flat, the material requires to be stretched, it’s normal, at first I was like there is no way to install stretching, but once I got a hang of it, the material fits the bumper like a glove, whoever designed this Kit is a MASTER.
Thank you for helping me with this install guys, ill be back with my next vehicle.
Quick Tip: Obtain Installation GEL, Steamer. makes a huge difference when it comes to stretching. These guys here are pros, they gave me insider tips that I would have never found online.
Follow the instructions, and you will succeed installing this kit in no time.
ChanR180 –
Purchased another kit Full Front kit from precutppf.store for my new 2023 Model Y. I have to tell guys, not having front parking sensors on the revised 2023 model Y is amazing, first attempt at installing the front bumper I nailed it. I used a steamer now.
Stretched it like butter, it’s all about the experience. The cut seems short, but it is not, you have to stretch the fingers out so it will lay flat.
I think I will try the doors and rear portion of the vehicle next, driving it on a highway I got a windshield chipped already and a small rock chip on an A-pillar.
Original post:
https://www.reddit.com/r/TeslaModelY/comments/nekkyq/reasonable_precut_ppf_kits/
Leon –
New 23 model doesn’t have the sensors, packaged very well, no issues installing the product.
Well made OEM brand. Very impressed!
Izzy –
Love it, outstanding support and knowledge on paint protection installs, this is my 3rd install overall, I have been buying from here for 4 years, new model y comes without parking sensors, much easier to install.
Got everything done in 5 hours, where first time I didn’t know what I was doing and it took me 2 days with screw ups, haha.
Now that I know how material stretches I’m a pro at this.
Whoever is trying this for the first time, please read reviews guys and in tesla forums, ask on here, message them, these guys have been doing this for 30 years, they have insider tricks, tricks you wont find anywhere, like using a steamer, gel, hot water to stretch the material.
First time I received the bumper, I’m like why is it so short, gave Dex hard time, sorry Dex, I know now it needs to be stretched, I forever grateful that you took your time to teach me and explain the process and art of paint protection.
Thank you
Izzy
MyLi Lo –
Outmost respect to Josh and his team, this stuff takes time and knowledge to install, I’m a very handy person, I do everything around the house and installing PPF required a little more experience than I looks like had.
Long story short Dex got in touch with me and helped me understand how everything worked, the stretching of the material, wrapping the edges, popping bubbles.
I have learned new techniques and abilities.
Mr dex, go ahead and send me new invoice please, I would like to redo bumper and 1 left fender, I’m a lot more confident now to try it again.
I’m watching videos you provided, I see now where I went wrong.
Simple mistakes on my part.
I appreciate you took your time and helped me with my questions.
Detail pros –
Perfect DIY store, great communication, fast responses.
Best cuts and brands on the market, they have all brands available, email them like i did for brand i wanted that wasn’t listed.
Easy to install, i have been installing window tint and paint protection for years, my plotter broke and needed kit asap, they took care of me, shipped it overnight UPS per my request.
I will buy all my kits from here, its cheaper then owning plotter plus paying monthly for software.
Great job guys.
Garcia’s Body Shop –
Awesome guys, very knowledgeable in their field, material patterns are very precise.
Express detail –
Ive been buying from Josh for years, i have my own shop, we do detailing, PPF and window tint, its cheaper for me to buy PPF from here. No issues ever, helps me not to carry all major brands.
Keep up good work guys
Jay Lee –
The 2023 model y install went smoothly, with no issues whatsoever, kit fitment is on point, stretched the bumper on without issues.
Dex thank you for helping me save some green by purchasing the kit with Bitcoin. The process was simple as it gets.
Guys if you want a discount paying with crypto is the way to go.
Took me 10-30 minutes max, go here to open a http://www.coinbase.com account, added my debit card and bank account, verified my identity, etc… purchase bitcoin, and next time I will buy Eth, gas is cheaper, save over $60+ paying with Bitcoin on my Tesla kit.
Regards,
J lee
Sean yong –
Great product like always! I’ve been a long time customer with these guys and they never disappoint. If you’re a new customer and trying to save a good chunk of money. Ask them about their payment with crypto currency! It works great and is very fast and easy after going through all of the steps!
Ting Lee –
Dex was the best.
I was on a tight budget and he was able to help me Dave some money. I checked out with his help with Crypto. I was able to save $60 with stek hydro. The install went well. The front bumper was a bit hard but I was able to install it.
Evin Wong –
Thanks to this business I have no doubt in my mind that my paint will be protected. They were very helpful by sending me videos on how to install and even gave me a squeegee to start with. Terrific customer support I will be buying again soon!
Peter –
This was a great experience for me. The bumper was a little hard. I had to order a replacement one and DEX helped me out with a deal.
Overall the install went great. The bumper did require some serious stretching but it worked.
Thank you again for all the help!
Bens Paint Protection LLC –
Cuts Were perfect, material was easy to stretch! I like how easy it is to pay and how helpful these guys are. I have been installing PPF for about 5 years and was looking for a company to buy from since my cutting machine broke. These guys are by far the best ! Thank you again!
Chuck –
Ordered two full fronts for my wife and my Model Y. The instructions were helpful. Thank you for the customer service.
Bingbing –
Staff was very friendly.
Shipping was quick.
Video instructions helped me.
Dong Wang –
Video instructions helped.
Took to STEK shop, said film is real and my Model Y looks amazing and protected.
Karl –
Great experience. Had some small issues. Still saved myself money!
Josh –
Fantastic team!
Instructions were top notch.
Lucas –
They shipped the kit quick! Got it 5 days after placing the order. Install went great!
Klark –
Had a great time with my wife installing the kit on our new model Y. Had some struggles but got it installed.
Luxury Auto Shop –
Fast shipping kits are always amazing.
We buy over 15 orders a month from them. Everything always fits as described. Stretching is required as ppf install experience is also required.
Yusuf –
Install was a bit time consuming but saved myself money and protected my Model y.
Jamine –
If you are looking for affordable protection go with their PPF 8 mil film, looks amazing.
Very good cuts.
Tk –
Good support, full wrap is a must if you gojng to keep your vehicle for a while.
John –
Easy going company, quick responses and shipping.
Felix –
Super Kundenservice, schneller Versand nach Deutschland und kinderleichte Installation. Die Schnitte sind wunderschön und die Passgenauigkeit ist erstaunlich.
Karla –
Best protection period, fast delivery, great packaging.